Managing Articles/Publication Entries
You have reached the help page for managing publication entries on your website. This feature has been custom integrated into a page or pages on your site by Fred's Used Websites.
Overview
The publications feature allows you to easily create a series of pages on a given topic. On your site there is a main page or index page that provides an introduction followed by a list of entries. Each entry is listed by title and can have a short abstract section on the main page. Your site visitors can scroll down through the list of topics and click on the link that interests them.
For example you might have a page that hosts a series of articles written by various individuals. Your index page will list all the titles/abstract for the articles you are sharing and will have links to a page with the entire article. You have the ability to enable/disable individual articles making the whole topic area quite dynamic.
For each article or "entry" as we will refer to them in the rest of the help text, you can enter them directly using our content editor -- or you have other options. Sometimes the entry you have is in the form of a Acrobat PDF file (a newsletter for example). You can upload that PDF to the site and refer to it rather than trying to reproduce it in HTML. This PDF file will be embedded in the content area of your pages so that you can view the PDF and still have your site links available. You can even reference a page on another website and have that embedded in your content area.
Explore! You will find that creating some entries and viewing them on your site is the best way to get acquainted with this powerful feature.
Getting Started
In order to manage this feature, you must be a Site Administrator on your site that allows members to log in -- or you must have the login/password to manage your site by logging in on fredsusedwebsites.com. We will cover the process you use when you are a Site Administrator.
 As the Site Administrator, click on the "Show Quick" administrative link in your greeting box. Normally this just shows you the Quick Edit links for the content areas on your page. Refer to the screen clipping above. When you are on a page that utilizes the Publications feature, you will see an additional link to the right of the Quick Edit Link allowing you to "Manage Entries". Clicking this link will take you to the Publications Management page on fredsusedwebsites.com. This page permits you to manage entries from all of your pages, not just the one from which you came.
Main Publication Page
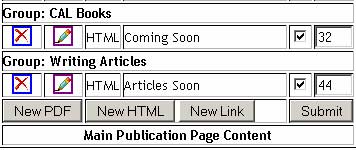
The screen clipping on the left shows an example of what you will see on the main Publications management page. The first thing you should notice is that the entries are divided into groups. There are two groups in this example "CAL Books" and "Writing Articles". Depending on your site configuration the presentation of these entries will be on one or more pages. If you site is configured with just one page, you will see the list of entries organized by group much the same way it is organized on this page. However some sites will be configured to have each group presented on its own page (this is the case with coloradoauthors.org ).
There are a number of controls in this table of entries. We will describe each below. Read carefully so you understand what each does.
Submit Button: The "Submit" button on the lower right corner of the table is used to apply any changes you made to the two columns directly above it. Make changes to the checkboxes or number boxes (described below) for as many of the entries you want to affect then click on "Submit" to apply those changes to the database. You must do this before you click on any of the other controls or the changes to these two columns will be lost.
Enable Entry: Check the box ![]() above the "Submit" button to make the entry visible on your website. Any boxes not checked will not appear on your website. This feature gives you the ability to turn items off without deleting them. For example, if you have items that are seasonal in nature you may want to turn them on only during that season. Remember to click "Submit" to apply these changes.
above the "Submit" button to make the entry visible on your website. Any boxes not checked will not appear on your website. This feature gives you the ability to turn items off without deleting them. For example, if you have items that are seasonal in nature you may want to turn them on only during that season. Remember to click "Submit" to apply these changes.
Sort Order: The number box to the right of the enable checkbox allows you to reorder the entries. If for example you had three entries under the "Writing Articles" group with sort numbers of 44, 45, and 46. These entries would appear sequentially with 44 as the first entry. If you want to reorder the list, exchanging the first and last items, just change the number in one of the boxes (i.e. change the number in the top entry to 46 and click "Submit".
Delete Entry: Click on the delete ![]() icon to permanently remove an entry from the database. You will be asked to confirm your choice, but when you have deleted an entry it is gone.
icon to permanently remove an entry from the database. You will be asked to confirm your choice, but when you have deleted an entry it is gone.
Edit Entry: Click on the edit ![]() icon to edit an entry. When you edit an entry you will be taken to another page that allows you to modify the entry. See the Edit Publication Entry Page below for details on editing an entry.
icon to edit an entry. When you edit an entry you will be taken to another page that allows you to modify the entry. See the Edit Publication Entry Page below for details on editing an entry.
Type and Title: On the right of the edit ![]() icon is a column that lists the type of entry (HTML, PDF, or Link) and to the right of that is the title of this entry. These are informational only and are used to help you identify the entry you want to manage.
icon is a column that lists the type of entry (HTML, PDF, or Link) and to the right of that is the title of this entry. These are informational only and are used to help you identify the entry you want to manage.
New Buttons: There are three buttons on the bottom that allow you to create a new entry. Click on the "New PDF", "New HTML" or "New Link" to make a new entry. You will be brought to a page that allows you to edit the new entry. Note this is the same dialog that you use to edit an existing entry. Each type is covered below.
PDF: Click on "New PDF" when the document you wish to display is a Adobe Acrobat PDF file. PDF files are an excellent way to display something that has been published on paper such as a newsletter or brochure. The PDF is displayed inside a frame in the content area of your page and appears along with all your normal navigational links, etc.
Link: Click on "New Link" when the content you wish to display is actually located on another website. The effect you get is a website within a website. The external website is displayed completele inside a frame in your content area and has your normal navigational links etc.
HTML: You will likely use this option most often. Click on "New HTML" to create an entry where you use the content editor to make a page in HTML format. When the site visitor clicks on one of these entries, they will look much like any other page on your site as your site's common style sheet is applied to these pages as with other site pages.
Edit Publication Entry Page
The Edit Publication Entry is where you enter or modify a given publication entry. Depending on the type, this dialog will appear slightly different. The screen clipping below is the dialog you will see when editing an HTML entry . All fields in this dialog starting at the "Name:" field on top through the "Abstract:" field are common for all three types. Take a look at the screen clipping below, then scroll down below the clipping for a discussion of each field. Further down we discuss the differences for a PDF and Link entry.
The best way to determine how this will look on your site is to just enter something in the fields and then view both the index and target pages. Formatting is controlled by entries in your site's style sheet. At this point in time you cannot modify the style sheet yourself. Please contact Fred's Used Websites if you wish to change how these fields appear.
Edit HTML Entry
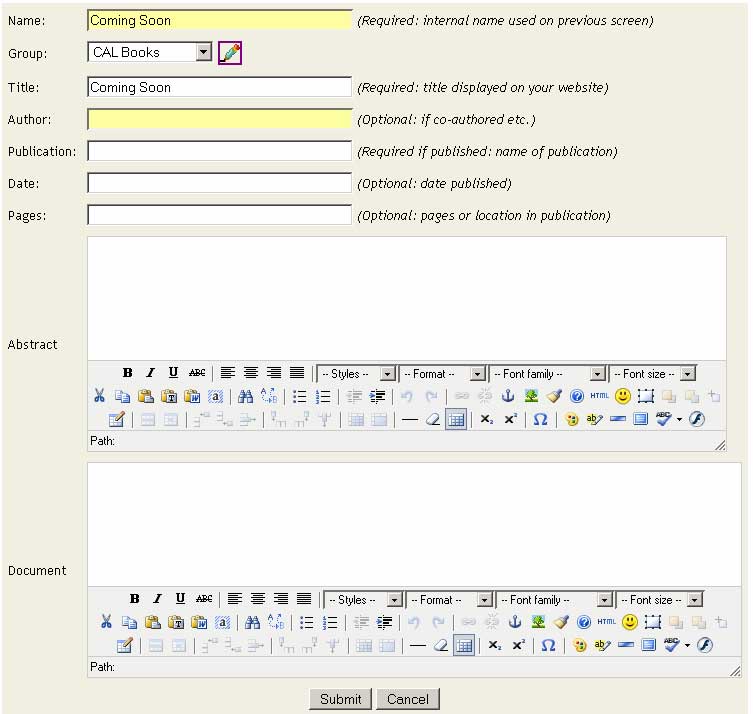
Name: The name field is used to identify this article in the list on the main publication page (above). You should name this something that makes sense to you and can be the same text as the "Title" field. In most cases this should be an abbreviated form of the "Title" field so that the table on the main publication page remains compact while still making it clear to you what the entry contains.
Group: The group field has a drop down selector which allows you to assign this entry to one of your groups. It also has an edit ![]() icon permitting you to edit your groups. If you do wish to edit your groups, be sure you have not made un-submitted changes to any other field or they will be lost. If you find yourself in a situation where you have made other changes and you wish to modify your groups, click on "Submit" on this form first, then return to this form from the main publication page.
icon permitting you to edit your groups. If you do wish to edit your groups, be sure you have not made un-submitted changes to any other field or they will be lost. If you find yourself in a situation where you have made other changes and you wish to modify your groups, click on "Submit" on this form first, then return to this form from the main publication page.
Title: The title field is the name that your site visitors will see as the title of this entry. On the index page of your site this will also be a link that when clicked takes the site visitor to the page displaying the entry. The text for this field should be more descriptive than the name field since your visitors won't be as tuned in to your topics as yourself. It should be something that catches their interest. The title will also appear at the top of the entry's page as its title.
Author: This field is optional. If this entry is an article or other publication by someone you wish to credit, enter the author's full name here. The author's name will appear on the index page under the title as well as on the entry's page. Pay attention to copyrights and b sure to always list the author and get their permission when posting another person's work on your site!
Publication: Use the optional publication field if you want to show the name of a publication this entry was originally published. It can be the name of a newspaper, magazine, website, or whatever you choose to enter. As with the author, this entry may be necessary to cover copyrights.
Date: Use this optional field to specify the date an article was originally written or if you have entered a publication, you can list the date this article was published in that publication.
Pages: This optional field can be useful if you have specified a publication & date.
Abstract: The abstract should be additional words attracting the visitor to click on the link. When a visitor is scanning your index page the titles of your entries will catch their eye and the abstract will be a brief description that piques their interest. The abstract field can be formatted in any way you wish, and can be used completely in lieu of the optional fields above when you want to control the formatting of this information. The abstract field can also be blank if the title of your article is sufficient.
Document: The document field is the main content for this entry's full page. Enter the content of your document here, including text, images, links, and whatever else makes sense. This content will appear on your site much like any other site page.
Edit PDF Entry
 The Edit PDF Entry dialog has one difference from the Edit HTML dialog. Rather than having a Document field we have a "PDF URL" field. The screen clipping on the right shows a cut of the very bottom of this dialog.
If the PDF is already online on another website, simply navigate your web browser to the PDF on that site. Don't download the PDF but display it in the browser. Once displayed in your browser copy the URL from your browser's address field and paste it into the text box. A PDF URLshould look something like "http://www.someothersite.com/path/file.pdf".
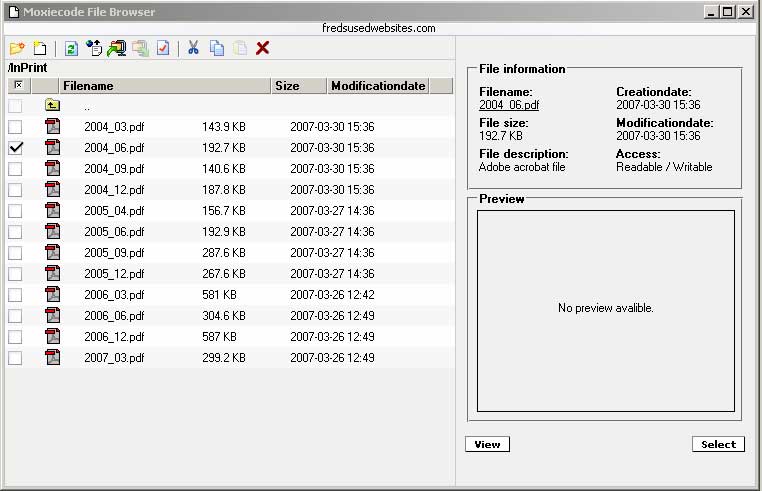
More often you will have a copy of the PDF on your local computer. In this case you must upload the PDF to your site's upload directory then reference that as the URL. Fortunately this all happens automatically when you use the upload file manager. Click on the file manager ![]() icon on the right of the Edit PDF dialog. This brings up the site upload file manager (below), allowing you to manage the files located there. Notice that like the file system on your computer you can create folders and organize files into these folders. It is best if you organize all the PDFs into one directory as you see in the example below. If the PDF is already on the site, just select that file (see the 2004_06.pdf that is checked in the example, and click on the "Select" button on the lower right. It's as simple as that. The correct URL will be entered into the PDF URL field (above) and you can display the PDF as this entry. Read on below if you need to upload a copy of the file...
icon on the right of the Edit PDF dialog. This brings up the site upload file manager (below), allowing you to manage the files located there. Notice that like the file system on your computer you can create folders and organize files into these folders. It is best if you organize all the PDFs into one directory as you see in the example below. If the PDF is already on the site, just select that file (see the 2004_06.pdf that is checked in the example, and click on the "Select" button on the lower right. It's as simple as that. The correct URL will be entered into the PDF URL field (above) and you can display the PDF as this entry. Read on below if you need to upload a copy of the file...
If the file you want to display is not already on the site you can upload it from your computer. Use the upload
 ![]() icon to bring up the upload dialog you see on the right.
icon to bring up the upload dialog you see on the right. ![]() is located on the toolbar at the top of the file manager dialog.
is located on the toolbar at the top of the file manager dialog.
To upload click on the "Choose..." button to select a file on your system. We won't show that dialog here as it is the common way you select a file on your computer. When you select the file, it will automatically enter that files path on your computer in the "File to upload:" field and will enter a URL friendly name in the "As file name:" field. If you wish to change this "as file name" field, go ahead, but remember to avoid special characters and especially the space character. You should use upper/lower case letters, numbers, "_", "-", and "." but avoid using the others.
If you DO use other characters it will still work, but the URL will not look as you expect. For example using "My pdf file.pdf" will result in a url that looks like "My%20pdf%20file.pdf" which is harder for someone to type correctly than "My_PDF_File.pdf".
If you want to upload several files, click on the "Add upload" button. When clicked, this button adds another set of "File to Upload" and "As file name" to the dialog.
Pay attention to the size of your upload. In this dialog, a file larger than 2 megabytes will fail to upload. You should make sure that your PDF file is optimized to be as small as possible as large files take a very long time to load on a dialup connection. If you have Adobe Acrobat Professional, you will be able to open and optimize the PDF. You might be surprised at how much smaller it can become.
Once you click "Upload" the file upload will begin. The time it takes for this will depend on your network speed and the size of your file. Be patient and wait to for this to complete. Once complete you should see the file listed in the file manager window. Select that file as described above.
Edit Link Entry
 The Edit Link Entry is also mostly like the Edit HTML Entry except that instead of the "Document" Field you have the "Ext URL:" field as shown on the right. The easiest and most fool proof way to get this right is to use your browser and navigate to the page on the external site you wish to embed into your entry page. Copy the URL from your browser's address field and paste it into the Ext URL text box and click "Submit". Make sure that you have properly filled out the other fields above "Ext URL" as well.
Remember that you won't know how this will look until you try it. You might experience horizontal and/or vertical scroll bars inside your content area. If it just doesn't look right, you may need to just copy the page and paste it into an HTML Entry. Remember to pay attention to possible copyright violations. Always be sure you have permission to reprint another author's work!
Edit Group Page
Use this dialog to manage your group entries.
Warning! Don't modify your groups if your site is configured with each group on its own page! The pages on your site that display a group of your publication entries are manually configured by Fred's Used Websites. You know that groups are dedicated to their own page if the "url" in the table below is different for each group.
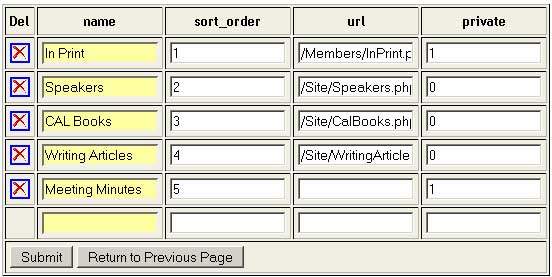
If your site is configured with all publication entries on one page, you may freely add or remove groups. Note: you probably won't want to remove groups if you have already created publication entries assigned to that group. On a single page, the publication entries are organized on the page by group with the group order based on the table above and the entry order based on the order defined in the main publication page. In fact, the order you see here IS the group order on the main publication page.
If you wish to add a group, modify group information, or re-order the groups, make your changes in the table above and click the "Submit" button.
The "url" and "private" columns are used by a feature on Fred's Used Websites that provide RSS feeds and sitemap descriptions for the search engines. In a nutshell, for all pages in each group marked not private (i.e private=0) and where the publication entry is enabled, those pages are listed in an XML file that becomes a feed to Google and Yahoo search engines to prompt them to crawl those specific pages facilitating the inclusion of the page in those search engine results.
When your site is configured with all groups on a single publication page, the name of the group as listed in the "name" column is what appears on the web page so be sure to use descriptive names.